
Send your recipes to your agent or our team in any format, then answer the few questions they can't settle. The COGS page then shows what every plate costs you at the prices on your invoices.
COGS stands for cost of goods sold. For a restaurant, it means what your food costs you. RestaurantMate works it out plate by plate. It takes each recipe and prices every ingredient at what you last paid on an invoice. Then it puts that cost next to what your POS (your register system) says you sold.
For example, at Juniper Kitchen the Juniper Smash Burger sells for $10.00. Its recipe is beef, a brioche bun, cheese, pickles, onion, mayo, fries and fryer oil. At the latest invoice prices that comes to $2.92 a plate, so its food cost is 29.2% of the price.
Words used in this article
- Recipe cost (also called plate cost): what the ingredients in one plate cost at the prices you paid.
- Food cost %: recipe cost as a share of what the item sold for. A $2.92 burger that sells for $10.00 is 29.2%.
- Theoretical food cost: what your recipes say the food you sold should have cost. The COGS page shows this by default.
- Actual food cost: what you really used, worked out from inventory counts. It is your opening count plus purchases minus your closing count.
- Modifier: a change rung up on the POS, such as "Add bacon" or "No bun (lettuce wrap)".
- Batch recipe: something you make ahead and use inside other recipes, like a house Caesar dressing.
- Fully costed: every line in the recipe has a price.
- Target: the food cost % you aim for. Items and days above it are flagged.
- SKU: one vendor's product, with its own product number.
Before you start
- Your role. To open the COGS page you need View access to Food cost & recipes. To add or change recipes, approve your agent's work, write modifier rules or set targets, you need Edit access. Owners have everything. The built-in Admin role has Full access and Location manager has Edit. Bookkeeper and View only can look at the page but can't change anything. They see the note "You can see food cost and recipes." See Give each person only the pages they need.
- The agent. Owners can use the in-app agent at every location, and so can people with the built-in Admin role. Other roles need AI agent access added to the role. At Juniper Kitchen, the manager Dev Patel has the Location manager role. He can edit recipes, but he only gets the agent if the owner, Maria Lopez, adds it to his role.
- Sales from your POS. Food cost is measured against what you sold. Sales come in from Toast or SpotOn today, and we add your POS on request. See Connect your POS sales (Toast and SpotOn).
- Your invoices. Recipe prices come from what you paid. The more of your invoices reach RestaurantMate, the more recipe lines have a price. See Find every invoice, receipt and bill on the Purchasing page.
- Optional: two inventory counts. To see actual food cost next to theoretical, take a count at the start and at the end of the period. See Do a count shelf by shelf.
Step 1: Send us your recipes
Send recipes in the form you already keep them: a photo of a recipe card, a PDF, a spreadsheet, or typed out. RestaurantMate sets them up, clears the obvious ones and asks you only about the unclear ones. There is no single import button. Use whichever of these suits you.
During setup
On your location's welcome screen, find the card Anything else? (it's optional) and click Add. Upload your files or paste a link. Tag each file as Recipes, Menu or Other. Our team and your agent set them up from there.
In the agent chat, any time
- On any location page, click Ask Basil in the top bar. You can also press Cmd+J on a Mac or Ctrl+J on Windows. The button shows the name you gave your agent. At Juniper Kitchen it's Basil.
- Click the paperclip (Attach) and choose Photo, PDF or spreadsheet. Images can be up to 5 MB. PDF, CSV and XLSX files work too.
- Type what you want, for example "Set these up as recipes", and send it.
Basil writes each recipe and its ingredient lines. Every change shows up in the chat as a card with an Undo button. Each recipe the agent writes stays marked as not reviewed until it has been checked. If you send a big stack, the chat hands the work to the background agent and tells you it's queued.
Drafts from your POS menu
Your agent also drafts recipes from your POS menu and the products you buy, so you don't need to send the simple items. Packaged drinks and beers are set up exactly: one bottle sold uses one bottle, and a 16 oz draft uses 16 fl oz from the keg. Plates, coffee drinks and cocktails get an AI draft that waits for a check in Review (step 3).
By hand
You can add any recipe yourself. See step 2.
Step 2: Add or fix a recipe yourself
In the sidebar, click COGS, then the Recipes tab.
Click New recipe. The dialog has two tabs.
- From the POS menu lists POS items that have no recipe yet. The amber number on the tab is how many are still missing. Tick the items you want and click the create button, for example Create 2 recipes. Each new recipe is named after its POS item and linked to it.
- Blank recipe is for anything else, such as a batch recipe. Fill in Name, Type (Menu item, Batch or Modifier), Yield and Unit. To start from an existing recipe, pick it under Start from a copy of. Click Create recipe.
Open the recipe and add its ingredient lines. Click Select an ingredient…, search for the item, then type the amount and pick the unit. You can pick another recipe here too, such as a batch dressing.
Check the price on each line. Each line says where its price came from: "delivered" with the date, a vendor's list price, or "set by hand". The top of the recipe shows how many lines have a price, for example "7 of 8 priced".
The recipe window also shows:
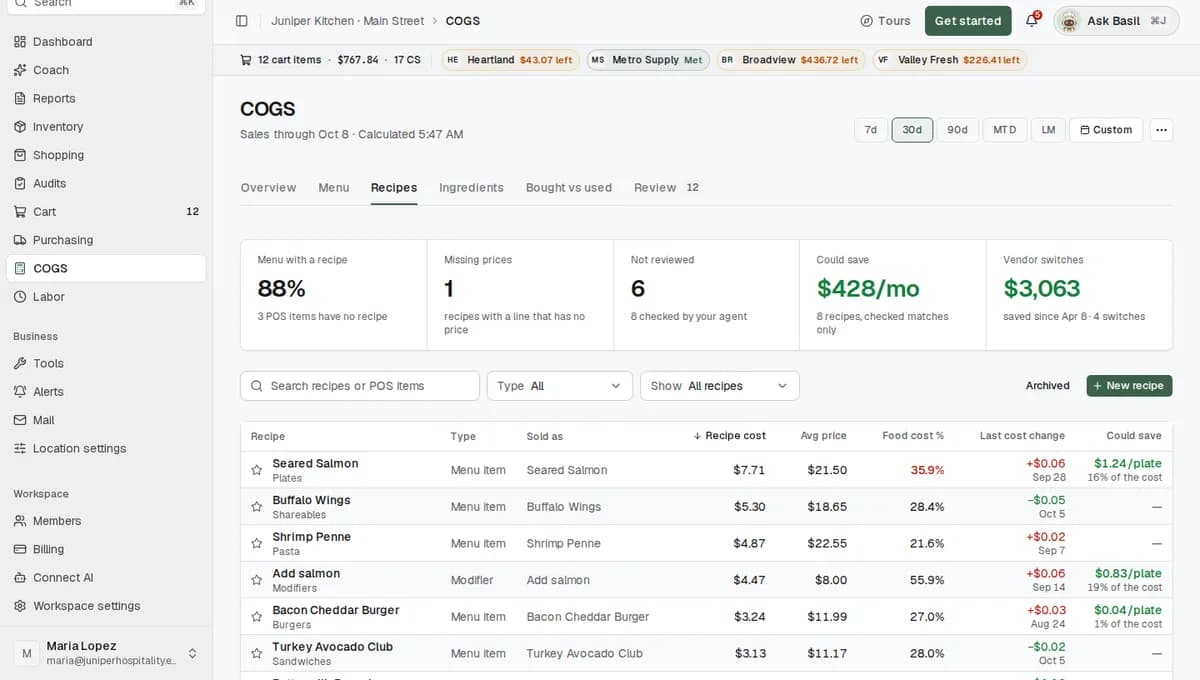
- Recipe cost for one plate at today's prices, with the average price the item sold for and its food cost %.
- Sold as: the POS items that use this recipe, each with its portion size. One recipe can be sold as several POS items, and each POS item uses one recipe.
- Cheaper options: cheaper products for the same ingredient from your other vendors. Click Use for this recipe to switch this line, or Use in every recipe to switch it everywhere it's used.
- Cost over time: a chart of the recipe cost. Each change is explained, such as a vendor switch, a price move or a change in quantity.
Step 3: Check your agent's work in Review
Two separate AI passes look at every recipe and modifier rule. The first one builds it. The second one checks it and marks the clear ones Checked by your agent. Anything it can't settle comes to you.
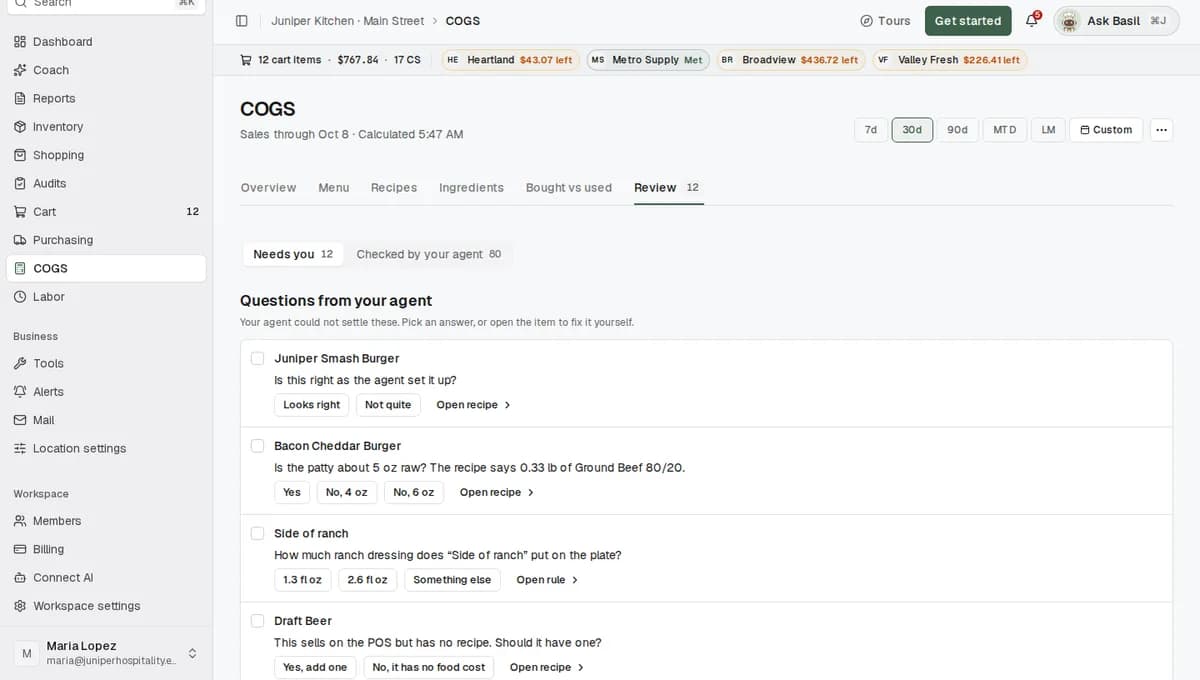
Click COGS, then the Review tab. It opens on Needs you, with a count next to it.
Answer the questions at the top, under Questions from your agent. Each one is a short question with two or three answer buttons. For a recipe the agent built, the question is often "Is this right as the agent set it up?" Your answer is saved to your agent's memory. If you'd rather fix the item yourself, click Open recipe or Open rule.
Work through the groups below the questions:
Group What it means AI recipes to check Recipes the AI built that nobody has confirmed. Modifier rules to check Rules the AI wrote for POS modifiers. Items without a recipe Menu items that sold but have no recipe, so their sales have no cost. Click Create recipe. Modifiers without a rule Modifiers that add no cost yet. Click Open rule. Ingredients without a price Recipe lines with no price yet. Click Set a price. Menu items missing prices Menu items whose recipe has at least one line with no price. Unmatched POS lines Sales lines from the POS that didn't match a menu item. Empty recipes Recipes with no ingredient lines. Price doesn't match the SKU A receipt price looks misread when compared with the vendor's product. Click Open receipt or Edit SKU. Use the High, Medium and Low filter to start with what matters most. To handle many rows at once, tick them and click Approve or Dismiss with the count, for example Approve 12. For simple builds like packaged drinks and modifiers that cost nothing, use the button such as Approve the 22 low-priority AI recipes and rules.
To see what the agent already cleared, switch to Checked by your agent. Each row shows the agent's reason, for example "matched the POS name and pack". Click Looks right to confirm it. Click Undo to send it back to your list. You can do this one row at a time or in bulk.
When nothing is left, the tab says "Nothing needs you right now. Your agent checked 212 items" (with your own count).
Step 4: Tell RestaurantMate what each modifier does
Your POS records modifiers on their own lines. Each modifier needs a rule that says what it does to the recipe, so "Add bacon" adds the cost of the bacon. Your agent writes most rules, and you check the ones it flags.
Click COGS, then Menu, then Modifiers in the Menu view switch. Or, in Review, click Open rule next to a modifier.
The Modifiers table shows each modifier with Uses, Charged, Cost, Net and What it does. "No rule yet" means the modifier isn't costed. "Not checked" means a rule exists but nobody has confirmed it.
Click a modifier to open its rule. Under What it does, pick one:
- Adds an ingredient. "Add avocado" adds avocado.
- Removes an ingredient. "No bun (lettuce wrap)" removes the bun.
- Swaps one ingredient for another. "Sub sweet potato fries" swaps the russet potatoes for sweet potatoes.
- Scales the whole recipe or one part of it. A "double" on a cocktail doubles the spirit and leaves the mixer as it is.
- Included, not costed for modifiers that change nothing in the cost, like "Dressing on the side" or "Well done".
Pick the Item and the Quantity, then the Unit (or Times when you scale). The Will read: line shows your rule as a sentence so you can check it.
Click Save and mark checked.
A rule can cover one item, one category or the whole location. The most specific rule wins. The rule window reminds you that a change reaches every item the rule covers.
A modifier joins the list once it has been used 3 or more times in 90 days. One-off special instructions are left out. For more examples, such as a "double" that scales only the spirit in a cocktail, see Cost your POS modifiers.
Step 5: Set your food cost target
- On the COGS page, open the … menu at the top right and click Food cost target….
- Type your Location target as a percent, for example 30.
- Optional: click Add a category target to give one category its own goal. Drinks often run lower than food, so Juniper Kitchen sets Drinks at 20%.
- Click Save target.
Items and categories above their target show in red across the COGS page. On the daily chart, a green tick marks the target.
Step 6: Read your food cost
Pick the dates
Use the chips at the top right: 7d, 30d, 90d, MTD (this month so far), LM (last month) or Custom. The line under the page title says how fresh the numbers are, for example "Sales through Oct 8 · Calculated 6:12 AM".
Overview
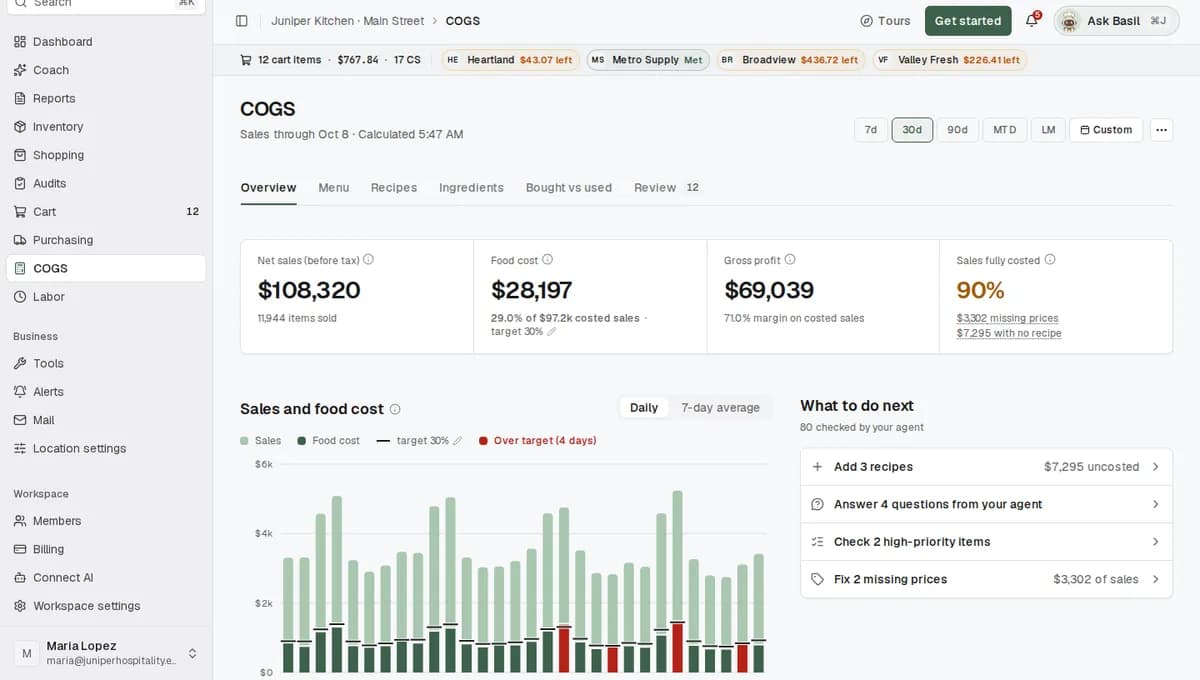
Four numbers sit across the top:
- Net sales: what the POS rang up for items sold, after discounts and before sales tax.
- Food cost: recipe cost in dollars, and as a percent of fully costed sales.
- Gross profit: sales minus recipe and modifier cost, for fully costed items. Labor and overhead aren't included.
- Sales fully costed: the share of sales where every recipe line has a price. Click the "missing prices" or "with no recipe" amounts under it to see which items are short.
Below them:
- Sales and food cost has one bar per day. The light bar is sales, the dark part is food cost and the green tick is your target. Switch between Daily and 7-day average. Click a day to see every item sold that day.
- What to do next lists the jobs that would make the numbers more complete, with the dollars of sales each one affects. For example "Add 3 recipes" or "Fix 4 missing prices".
- Food cost by category shows each category against its target.
- Biggest cost drivers lists the ingredients that make up most of your food cost.
- Items out of line lists dishes whose food cost % is well above the rest of their category.
- Vendor price changes lists ingredients whose price moved 3% or more between deliveries, with the cost effect and the menu items affected.
Menu
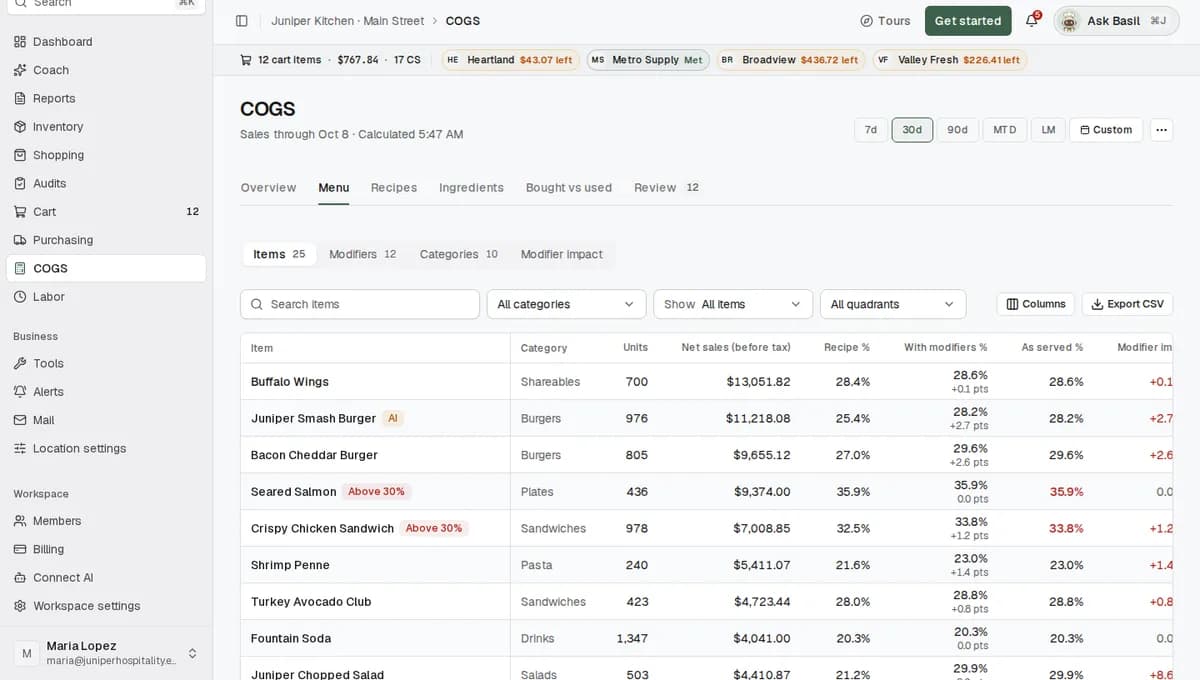
Click the Menu tab. The Items view lists every menu item sold in the range, with units and net sales. It shows three food cost percents side by side:
- Recipe %: the recipe as written.
- With modifiers %: the recipe plus the add-ons, removals and swaps that were rung up.
- As served %: all of that plus included sides.
Contribution is what the item brought in after food cost: its sales minus its recipe and modifier cost.
Use Show to filter by All items, Above target, Fully costed, Missing prices or No recipe cost. Use Columns to add Avg item price, Recipe cost each or Margin %. An AI chip next to a name marks a recipe the AI built that nobody has confirmed.
Click an item to open its details:
- Units sold, net sales, recipe cost per plate, food cost % and margin per item.
- What the recipe cost is made of: each line, its price and where the price came from.
- Served as: each way the item went out, including sides rung up at $0.
- The modifiers sold with it, and its sales by day.
The Modifier impact view shows three tiles. Recipe cost is the recipes as written. With modifiers adds the add-ons, removals and swaps as rung up. As served adds included sides. A sentence above them sums up how much modifiers added to food cost this period. Rank the modifiers by Cost impact, or by Money lost to find add-ons you charge less for than they cost.
The Categories view shows food cost % for each POS category.
Ingredients and Bought vs used
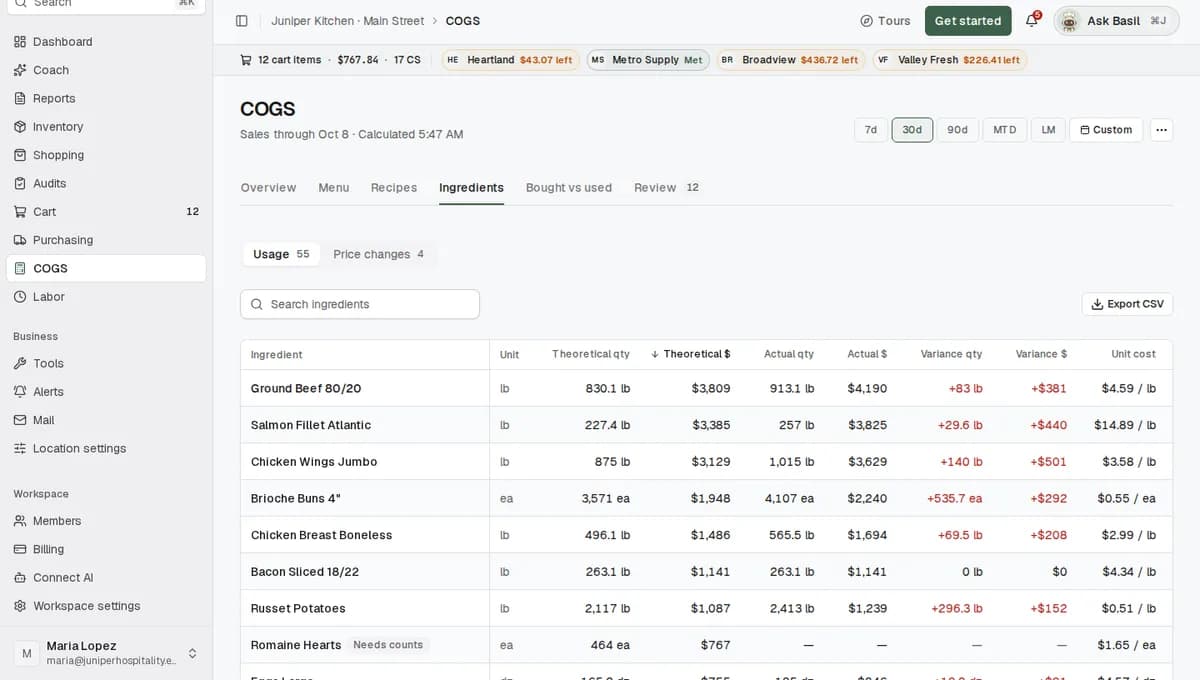
- Ingredients > Usage lists each ingredient's theoretical use and its price, with the source of that price: Price set by hand, Last delivered price, Vendor list price or No price. Actual use and the difference (variance) appear once you have counts. Price changes lists the ingredients whose price moved.
- Bought vs used compares what you bought with what your recipes say you used. It needs no counts. The gap includes waste, spoilage, over-portioning, comps and stock still on the shelf. Ingredients are grouped into Compared, Don't add up (more than 2x apart) and Can't compare (no price, or the units don't convert).
Actual food cost
At the bottom of Overview, the Actual food cost panel compares theoretical cost with what you really used. It needs an inventory count at the start and at the end of the range. The panel works it out as opening count plus purchases minus closing count. It covers the dates between the two counts, which can differ from the range you picked. Purchases here include everything invoiced in that window, such as beer, paper goods and fees.
What happens next
- Every night, RestaurantMate recalculates food cost for the last 35 days. Each day's recipe cost is saved, so past days keep their numbers when prices move later.
- When you change something, such as saving a recipe or setting a price, an update is queued. You can also start one with Recalculate in the … menu. It runs on the RestaurantMate device in your restaurant or on our server and usually takes a few minutes. While it runs, the line under the title says "Updating" with how many days are done.
- Prices follow your invoices. A price you set by hand comes first. Next is the last delivered price, taken from the invoice and turned into a price per unit. If nothing has been delivered yet, the vendor's list price is used and labeled that way. AI never guesses a price.
- Your agent keeps working. The background agent goes over recipes and modifier rules every 6 hours, then checks that work. New POS items show up in Review under Items without a recipe.
- Other pages use these numbers. The Dashboard has food cost widgets, and Coach and the weekly report include food cost. You can also set an alert such as "Recipe cost over $5". See Create an alert in plain language.
Tips
- Do the biggest jobs first. What to do next shows the dollars of sales each job affects. Start at the top.
- Check Sales fully costed before you trust the %. Food cost % only counts fully costed items, so a missing price doesn't drag the number down. A low share means the % covers less of your menu. The weekly report shows food cost only when at least 80% of the week's sales are costed.
- Ask about one recipe. Click Ask about this on a recipe. The agent opens with that recipe attached and a prompt such as "Check this recipe and fix anything that looks wrong".
- Count at the start and end of each month. Two counts turn on the Actual food cost panel, so you can see how far real use is from your recipes.
- Look at Could save. The Could save tile on the Recipes tab adds up cheaper products at your other vendors, per month. Open a recipe's Cheaper options to switch a line. See Compare prices across your vendors.
Troubleshooting
Food cost % looks too low or too high. Look at Sales fully costed first. Click its "missing prices" or "with no recipe" amounts to open the items that are short, then fix them in Review.
A recipe line has no price. Nothing has been delivered for that ingredient yet, and no list price is on file. Wait for the next invoice, or set one yourself. In Review, click Set a price. Or open the ingredient on the Ingredients tab, go to Change price or unit conversion, type the price in Manual price per lb (or your unit) and click Save price. To go back to invoice prices later, click Clear override.
A keg or case shows "Pack incomplete". Drinks bought by the keg or case need to know how many pours are in one pack. Open the ingredient on the Ingredients tab and fill in the Unit conversion under Change price or unit conversion.
A side shows a food cost over 100%. Sides rung up at $0 with an entrée carry their cost on their own row. That cost belongs to the entrée. Open the entrée and look at Served as to see it counted correctly.
An item shows "Check recipe". Its cost looks out of range for that kind of item. Open the recipe and check the amounts and units.
Review says "Price doesn't match the SKU". A receipt price looks misread next to the vendor's product, often because a quantity was read wrong. Click Open receipt to compare it with the paper copy, or Edit SKU to fix the product's details.
The page says "Calculating food cost for this range". Some days in your range haven't been worked out yet. Click Calculate now, or leave it and it runs tonight.
The title line says "Update queued at" a time, then "not started". The RestaurantMate device or server that runs updates isn't online right now. The nightly run still happens. See The RestaurantMate device.
The Actual food cost panel is empty. It needs an inventory count at the start and at the end of the range. Take a count, then pick a range that sits between two counts.
Every item is in one category. Some POS menus arrive without categories, and the category views then show one group. The page says "Every item sold is in one POS category." Ask our team to set your categories.
Today's sales are missing. Toast sends its data once a night, so sales usually run through yesterday. SpotOn sales sync about three times a day.
A modifier isn't in the list. A modifier is added once it has been used 3 or more times in 90 days.
An item is in Items without a recipe, but it never needs one. Gift cards, service charges, discounts and open items are skipped on their own. For anything else, open New recipe > From the POS menu, tick the item and click No recipe needed.
Common questions
Do I have to type every recipe? No. Send what you have: a photo of a recipe card, a spreadsheet, a PDF, or a few lines typed in the chat. Packaged drinks and beers are set up automatically. The AI drafts the rest and asks you only about the ones it can't settle.
Where do the prices come from? Does the AI guess them? From your invoices: the last price you paid, turned into a price per pound, per each or per ounce. A price you set by hand comes first. If nothing has been delivered yet, the vendor's list price is used and labeled as such. The AI never guesses a price.
Why is my food cost % different from my accountant's? The COGS page starts from theoretical cost, which is what your recipes say the food you sold should have cost. Your accountant usually works from purchases and stock. Take an inventory count at the start and end of the period, and the Actual food cost panel shows both numbers and the gap between them.
What does "Checked by your agent" mean? A second AI pass looked at a recipe or modifier rule that the first pass built and found it clearly right. That means every line has a price, the units convert, the cost is in a normal range for that kind of item, and the name matches what the POS sells. It counts as reviewed. You can confirm it with Looks right or send it back with Undo at any time.
How are "Add bacon" and "No bun" counted? Each modifier has a rule that adds, removes, swaps or scales an ingredient. "Add bacon" adds the cost of the bacon to that plate, and "No bun (lettuce wrap)" takes the bun off. The Modifier impact view shows how much modifiers added to your food cost, and which add-ons you charge less for than they cost.