
Save the username and password you use to order on a vendor's website. RestaurantMate then checks your prices there every night, picks up your invoices and fills that vendor's cart when you send an order. You review the cart and check out.
A website vendor is any vendor you order from by signing in to its website or app. At Juniper Kitchen that's Heartland Foodservice, which supplies most of the kitchen, and Club Wholesale, a club store. For a vendor that only emails invoices, or one you call or pay at the counter, see Connect a vendor you order from by email or phone.
In RestaurantMate, a connection to a vendor, a POS (your point-of-sale system) or a labor app is called an integration.
Before you start
Who can do this
You need to be an owner, or have a role with Full access to Location settings at that location. The built-in Admin and Location manager roles have it. For anyone else the buttons are greyed out, and hovering over one shows which access is missing. See Give each person only the pages they need.
What to have ready
- The address of the vendor's website, the page where you sign in to order.
- The username (or email) and password you order with today. RestaurantMate signs in with your own account. It does not create vendor accounts.
- Your account number, if you have more than one account with that vendor.
Saving a login takes about a minute.
Where the signing in happens
The RestaurantMate device does the signing in. It's a small computer plugged into your restaurant's router. Many vendor websites block sign-ins from cloud servers, so the device signs in from your restaurant's own internet connection. It uses a normal web browser, with one separate browser for each vendor login, so two locations that order from the same vendor never share a cart. See The device: what it does, where it goes, the deposit.
Which way to connect
- Your location is still being set up. Its pages open the Welcome to RestaurantMate screen. Add your vendors there, and our team connects them for you.
- Your location is already running. Add the vendor yourself in Location settings, on the Integrations tab.
Connect a vendor while you set up a new location
Until a new location goes live, every page of it opens the Welcome to RestaurantMate screen. Your vendor logins go in the Vendors card.
In the Vendors card, click Add vendor. Type the vendor's Name, for example Heartland Foodservice, and click Add vendor.
Under How do you order?, choose Website or app. In Website, type the address of the page where you sign in to order.
Click Add login. In the Login window, fill in Username or email and Password. If you need anything else to sign in, like your account number or the phone number that gets verification codes, put it in Login notes. Click Save.
The message "Login saved privately" appears, and the vendor's row says Login saved. The password isn't shown again after you save it.
If you like, add the Rep name, Rep phone and Notes. Use Notes for how you order from this vendor and how the invoice reaches you. Our team reads it when they connect the vendor.
Do the same for each vendor you order from online. A row that still says Login needed or Needs details is missing something.
Fill in the rest of the welcome screen, tick the box that confirms you understand how your details are stored, and click Send.
After you send, each vendor shows where it stands:
| Label | What it means |
|---|---|
| Received | We have the vendor's details. |
| Connecting | Our team is connecting it. |
| Connected | RestaurantMate can sign in to this vendor. |
| Needs attention | The login didn't work. Click the vendor to enter it again. |
The screen says "This usually takes a few days." The first-time setup takes 2 to 4 days, and we let you know when your data is ready. You can still add vendors after you send. For the other cards on this screen, see Tell us about your location: vendors, email and inventory sheet.
Add a website vendor to a location that's already running
In the sidebar, open Location settings and choose the Integrations tab. The Connected integrations table lists everything this location is already connected to.
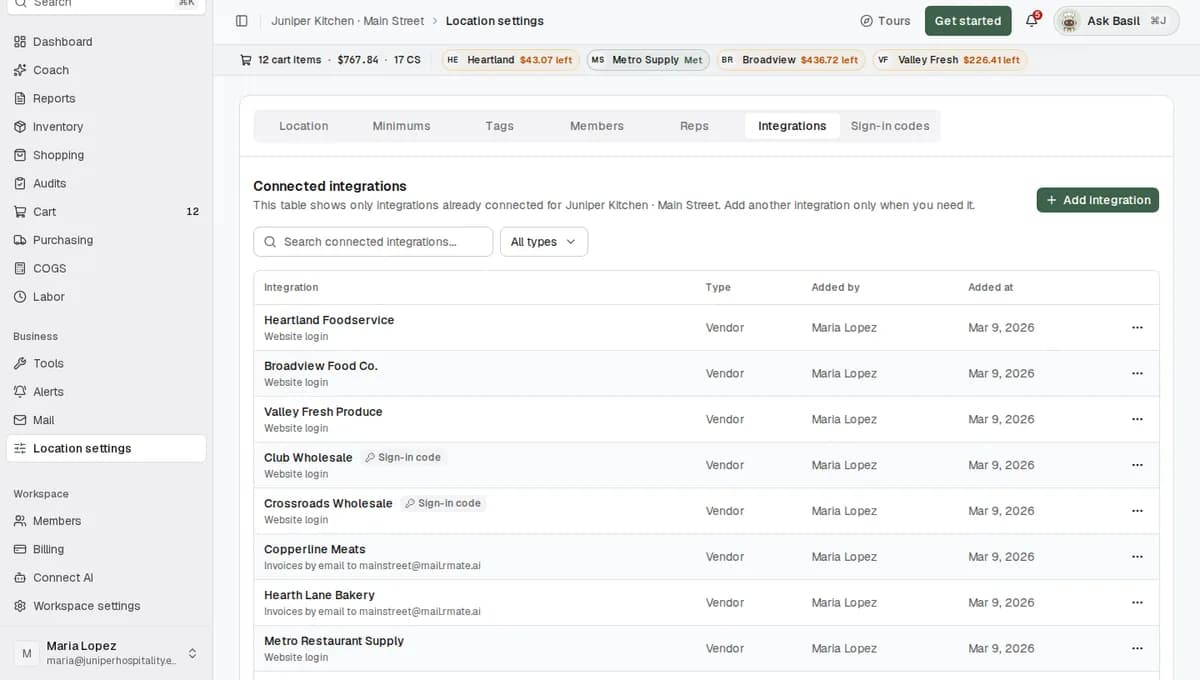
Click Add integration. Type the vendor's name in Search integrations... and choose the vendor.
Fill in the fields the vendor needs. Most ask only for a username and password. A few ask for an extra field. Click Connect.
The message "Integrations updated" appears, and the vendor joins the Connected integrations table.
The list in Add integration shows only vendors RestaurantMate already connects to. If yours isn't there, tell our team which vendor you use. We build the connection for you, usually within days.
What happens next
When a website vendor is connected, the device runs a first import:
- It signs in and brings in up to the last 180 days of invoices (about six months) from the vendor's site, plus any order guides or lists you've saved there. This takes longer than saving the login.
- Our AI reads each invoice line by line and matches each line to your items. Those items show up on your Inventory page, which is your order guide: the list of everything you buy. Items that aren't on one of your lists yet wait in the Imported Items list until you sort them.
- RestaurantMate searches the vendor's website for the other items you buy, so you can compare its prices with your other vendors.
After that, the work runs on a schedule in your location's time zone. Each job picks a different minute every day.
| What RestaurantMate does | When |
|---|---|
| Checks the prices of the items you buy | Every night, between 12:05 and 5:30 am |
| Checks that the login still works | Once a day, between 1 and 7 am |
| Picks up new invoices | Once a day, between 6 am and 11 pm |
| Checks order status, for vendors that share it | About every 4 hours |
You can now search this vendor's website from Shopping and send orders to its own online cart from your Cart. RestaurantMate fills the vendor's cart and checks every line, so you can review and check out. See Search products and add them to one cart.
Tips
- Connect each location with the login it orders on. If Main Street and Riverside share one Heartland Foodservice login, the invoices from that account show up at both locations.
- Changed a vendor password on the vendor's website? Update it in RestaurantMate the same day with Update connection (see Troubleshooting). Until you do, RestaurantMate pauses its background work on that login.
- If a vendor asks for a 6-digit code from an authenticator app (a phone app that shows a new code every 30 seconds) when you sign in, add it under Location settings > Sign-in codes. See Add a vendor's sign-in code.
- To get an email when a vendor login stops working, open Alerts and start from the Vendor login broken preset. Creating alerts needs Full access to Alerts.
- The time zone under Location settings > Location sets when the nightly price checks run.
Troubleshooting
A vendor shows Needs attention on the welcome screen
The login didn't work. Usually the password changed or the vendor added a security step. Click the vendor, enter the login you use today and click Save.
A vendor password changed on a location that's already running
- Open Location settings and choose the Integrations tab.
- Open the menu at the end of the vendor's row and click Update connection.
- Enter the new password and save.
Saving the new login clears the problem, and the nightly work for that login starts again. Our team also watches for logins that stop working and follows up with you. See When a vendor login stops working.
The vendor asked for a code sent by email
RestaurantMate stops at that vendor and shows a message like "Club Wholesale asked for a verification code. Sign in to Club Wholesale once by hand, then reconnect." Sign in to the vendor's website yourself once, then use Update connection for that vendor. If the vendor texts a code to your phone every time you sign in, tell our team before you connect it.
My vendor isn't in the Add integration list
Tell our team which vendor it is. We build new vendor connections on request, usually within days. Until then, its invoices can still come in by email or as photos of receipts. See Connect a vendor you order from by email or phone.
The Add integration or Connect button is greyed out
Your role doesn't have Full access to Location settings at this location. Ask an owner to change your role or do it for you.
Common questions
Do I have to give RestaurantMate my vendor password?
For website vendors, yes. RestaurantMate signs in as you, from the device in your restaurant, to read your prices and invoices and to fill your cart. Your password is stored privately and used only to sign in to that vendor. Nobody can see it in the app after you save it, including you. Vendors you order from by email, phone or on paper need no password.
How long does connecting take?
Saving a login takes about a minute. The first import brings in up to six months of invoices, so it takes longer. For a new location, our team connects your vendors for you, usually within a few days.
Will RestaurantMate place orders on my vendor accounts by itself?
No. It fills a vendor's cart only when someone with Full access to Ordering clicks Send in your RestaurantMate cart. It checks every line, then you review the order and check out. If the vendor's cart already has items in it, RestaurantMate asks whether to clear them first, add on top or skip that vendor. The daily login check adds one test item to the cart and removes it again. It never removes items that were already there.
Can I disconnect a vendor?
Yes. In Location settings > Integrations, open the menu on the vendor's row, click Disconnect and confirm. RestaurantMate stops using that connection. The saved login is kept so you can reconnect later. If you want the saved login deleted as well, ask our team.