
Arrange everything your location buys into lists that follow your kitchen. Then give each item a par (the amount you want on the shelf), so every count shows what is running low.
The words in this article
| Word | What it means |
|---|---|
| Order guide | Every item this location buys. In RestaurantMate it's the Inventory page. |
| List | A place in the restaurant, such as Walk-in cooler, Freezer or Bar & beverage. |
| Sub-list | A shelf or group inside a list, such as Produce or Dairy & Eggs. On the Inventory page each sub-list is a group you open and close. |
| Par | The amount you want on the shelf. The box where you set it is labelled Order up to. |
| On hand | What the last count found. |
| Count | Someone counting a list, shelf by shelf. The app calls counts Audits. |
Before you start
Who can do this. Owners can do every step in this article. So can people with the built-in Admin or Location manager role. If you use a custom role, here is what each part needs:
- Setting pars, adding items and moving items need Edit on Inventory.
- Removing an item from a list and merging duplicates need Full on Inventory.
- Creating and changing lists (Edit lists) needs Full on Location settings.
People with View on Inventory can look up items, stock and prices. They see a "View only" note at the top of the page. See Give each person only the pages they need.
What you need. You don't have to type in your inventory. RestaurantMate builds your item list from your vendors' invoices, so connect your vendors first if you can (see Tell us about your location). If you already keep an inventory sheet, you can send it to the RestaurantMate team during setup, and we use it to start your lists.
Step 1: Open the order guide
- In the sidebar, click Inventory. This is the page a location opens on.
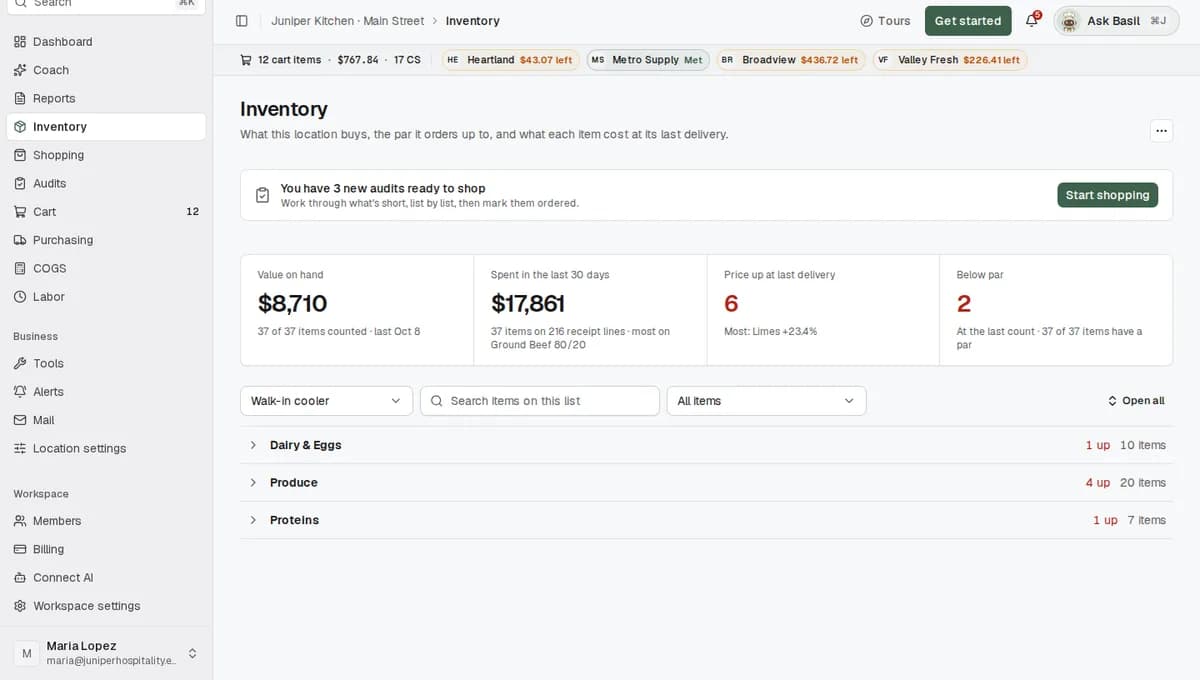
- At the top are four tiles: Value on hand, Spent in the last 30 days, Price up at last delivery and Below par. Click a tile to filter the guide by it.
- Under the tiles are the list picker, a search box, the Show filter and your sub-lists. Sub-lists start closed. Click one to open it.
If the page says No lists yet, go to step 2.
Step 2: Create your lists and sub-lists
Build your lists in the order you walk the restaurant. Juniper Kitchen · Main Street has five: Walk-in cooler, Freezer, Dry storage, Bar & beverage and Front of house. Inside Walk-in cooler are the sub-lists Produce, Proteins and Dairy & Eggs.
- Click the ... menu at the top right of the Inventory page (Order guide settings) and choose Edit lists. On an empty page you can click Add your first list instead.
- Click Add list. The Add a list dialog offers two ways:
- Add manually. Type a name such as "Walk-in cooler" and click Create.
- Create with AI. The List assistant opens. Describe how your kitchen is laid out, or click Suggest from my inventory. You can also attach a menu, an invoice or a spreadsheet. When the suggested lists look right, click Apply these lists.
- Under a list, click Add sub-list. Type a name such as "Produce" and click Create.
- Arrange them:
- Use the up and down arrows on a list to move it earlier or later.
- On a sub-list, open the ... menu. Move to puts it under another list. Remove sub-list removes it.
- The trash icon on a list removes the whole list.
- Changes save as you go. The label at the top right changes from Saving… to Saved. Click Back to the order guide when you're done.
Step 3: Put your items on the lists
Your items come from your invoices. When RestaurantMate reads an invoice and finds an item that isn't on any list yet, it puts the item in a list called Imported Items. That list shows up after your own lists in the list picker whenever it has items in it.
Let the AI sort your imported items
- When imported items are waiting, a banner says Imported items are ready to organize. Click Organize with AI. If you started earlier and stopped, the button says Continue with AI.
- The Organize imported items dialog opens. Pick what you want to do:
- Auto-assign lists. The AI suggests a sub-list for each item and groups its suggestions by sub-list. Check them, then click Move approved items. Nothing moves until you click it.
- Find merge candidates. The AI looks for imported items that are the same as an item already on your lists. Each pair shows how sure it is and why. Tick the pairs that really are the same and click Merge selected.
If a suggestion puts an item in the wrong place, move it afterwards (see below).
Add an item yourself
- Open a sub-list and click Add item. The dialog's title names the sub-list, for example Add item to Produce.
- Type the item's name. If it's already in your inventory, pick it from the results. If it's new, click Create "<name>".
New items get search words and a unit from AI. RestaurantMate also searches for them on your vendors' websites in the background.
Move an item to another sub-list
Click the item's row. The Vendors and prices panel opens under it. Open the panel's ... menu, choose Move to and pick the sub-list. Remove from list is in the same menu.
Step 4: Put items in the order you walk
The # column shows each item's place in the guide. Counts on the Audits page list items in the same shelf order, so match it to how your shelves are laid out.
- Open a sub-list and click Edit in sheet. The group turns into a spreadsheet.
- Drag rows by their handle into the order you walk the shelf.
- To move or remove several items at once, tick their rows. A bar appears at the bottom with the number selected, Move to and Remove.
- Click Done editing.
Step 5: Set a par on each item
- Open a sub-list. In the Par column, click Set par on the item. If it already has a par, click the par to change it.
- In Order up to, type the amount you want on the shelf.
- In Unit, pick the unit your staff count in.
- Click Save par.
At Juniper Kitchen · Main Street, tomatoes come in a 25 lb case and the cooks count cases. The par is Order up to 4, Unit case.
To clear a par, empty the Order up to box and click Save par.
Setting a lot of pars? In Edit in sheet you can type straight into the Par and Par Unit columns. You can also fix a par during a count, or with Edit par while shopping.
To find items that still need a par, pick Show > No par set. Until any item has a par, the last tile reads No par set.
Step 6 (optional): Print or export the guide
- Click the ... menu and choose Export.
- In Export order guide, tick the lists you want, or click Select all.
- Pick Spreadsheet (one sheet per list, sortable and filterable) or PDF (print-ready, one page per list).
- Click Export.
What happens next
- Your team counts. Staff count each list on the Audits page in the order you set. When a count is sent, On hand updates and owners and admins get an email. See Do a count shelf by shelf.
- You see what is low. The Below par tile shows how many items were under par at the last count. Click it, or pick Show > Below par at the last count. The on-hand amount of each item under par is highlighted.
- You shop what is short. In Shopping, a new count shows up as ready to shop. Items under par come first, each with a suggested amount filled in. RestaurantMate fills each vendor's online cart and checks every line. You review the carts and check out. See Search products and add them to one cart.
- Prices fill in from your invoices. Last bought, Unit price, Change and Spent 30d come from your delivered invoices. Value on hand is what you counted times the prices you actually paid, or the vendor's current price for items you haven't bought yet.
- New items keep arriving. Anything new on an invoice lands in Imported Items for you to place.
If you want an email when an item is under par after a count, create an alert from the Item below par after a count preset. See Create an alert in plain language.
Tips
- Name lists after places and sub-lists after shelves or kinds of product. A new cook can then find Dairy & Eggs in the walk-in on their first count.
- Start with pars on the items you run out of most. The Below par tile shows how many of your items have a par, for example "120 of 140 items have a par".
- Set the par in the unit people count in. Heavy cream comes in a 12 qt case, but if your cooks count quarts, set its par in qt.
- Click any item to see every vendor's price for it in Vendors and prices, and add it to the cart from there. With a row open, the arrow keys move to the next item.
- The address bar keeps your open list, search, group and item. Copy the link to send a manager straight to an item.
- Owners and Admins can ask the in-app agent (Basil, at Juniper Kitchen) to change a par, for example "Set the heavy cream par to 6 qt". Each change it makes shows with an Undo button.
Troubleshooting
A button or menu item is greyed out. Your role is missing an access level. Hover over it to see which one, then ask an owner. Edit lists needs Full on Location settings. Remove from list and Merge selected need Full on Inventory. If the Par column says "No par" and won't open, your role can only view Inventory, and setting pars needs Edit.
An item is low but isn't marked below par. RestaurantMate compares on hand with par only when both use the same unit. A count in cases against a par in pounds is neither below par nor fine. Set the par in the unit people count in. Or, in Shopping, an item counted in a different unit than its par lets you say how many of one make the other (for example, 2 bags make a case). RestaurantMate saves that for the product.
On hand says "not counted". Nobody has counted that item yet. On hand comes from the latest count on the Audits page.
I can't find an item I buy. The search box searches only the open list. Switch lists with the list picker and check Imported Items. If it isn't there, add it with Add item.
The Change column says "Check pack". The price moved more than RestaurantMate trusts (up more than 100% or down more than 50% since the delivery before). That usually means the receipt shows a different pack size. Click the item to check its deliveries.
Unit price is empty. Either the item was never delivered at this location, or the pack size on the receipt couldn't be turned into a unit. In the second case the column says so.
Imported items have nowhere to go. You need at least one list before you can organize them. Create a list in step 2. Your imported items wait in Imported Items until then.
Common questions
Do I have to type in my whole inventory? No. RestaurantMate builds your items from your vendors' invoices. You place them on lists, and the AI can suggest where each one goes. You can also send us your current inventory sheet during setup.
Does a par place orders for me? No. A par sets what you want on the shelf. After a count, items under par are marked short in Shopping, and you choose what goes in the cart. RestaurantMate fills each vendor's cart, and someone with full ordering access reviews it and checks out.
Where does "on hand" come from? From the latest count of that item on the Audits page. It's only as current as that count.
Can my second location use the same lists? Each location has its own lists and pars. If both locations work from the same inventory sheet, upload it on each location's welcome screen during setup.