
The Purchasing page holds every order, invoice and receipt from every vendor at one location. Bills like rent and electric sit on their own tab of the same page. This article shows you how to find any document, open it, check it against the original and download it.
A few words this article uses:
- Invoice or receipt: the paper, PDF or photo a vendor gives you for what you bought. On screen, RestaurantMate calls both a receipt.
- Purchase: one row in the list. It is the order with its receipt (or receipts) inside it. A receipt that arrives with no order, like a club store receipt, still gets its own row.
- Bill: a charge that isn't food or supplies, such as electric, rent or a repair.
- Food cost (COGS): what the food you sell costs you. COGS stands for "cost of goods sold."
- Credit: a document that takes money off what you owe, like a credit memo. Any document with a negative total counts as a credit.
Before you start
- To look at the page, you need View access to Purchasing. Owners have it. So do these built-in roles: Admin, Location manager, Counts & purchasing, Buyer, Bookkeeper and View only. The Inventory counter role does not see Purchasing.
- To add documents, mark items or change a status, you need Edit access to Purchasing. Admin, Location manager, Counts & purchasing, Buyer and Bookkeeper have it. With view-only access, the page shows "You can look at receipts, bills, orders and prices." and the Add button is greyed out. See Give each person only the pages and locations they need.
- For invoices to arrive on their own, connect at least one vendor that has a website, or set up the location's RestaurantMate inbox. Until then you can upload invoices yourself with Add.
How invoices get to this page
Every document lands on this page, however it arrives.
| How it arrives | When it shows up | What you do |
|---|---|---|
| From a vendor's website (vendors you connected with your own login) | Once a day, sometime between 6 am and 11 pm your time. The first time you connect a vendor, we pull about six months (180 days) of past invoices. | Nothing |
By email to your RestaurantMate inbox (an address ending in @mail.rmate.ai) | Right away | Give the address to your vendor reps and list them as senders in Mail |
| By email to your Gmail or Outlook | Within about two hours | Connect the mailbox in Mail and list the senders |
| Uploaded by you | After you check the details and press Submit | Add, then drop up to 20 PDFs or phone photos |
| Typed in by hand | Right away | Add, then Or record an order by hand |
Email only brings in PDF attachments from senders you have listed. Orders you send from your RestaurantMate cart show up here too.
Step 1: Open Purchasing
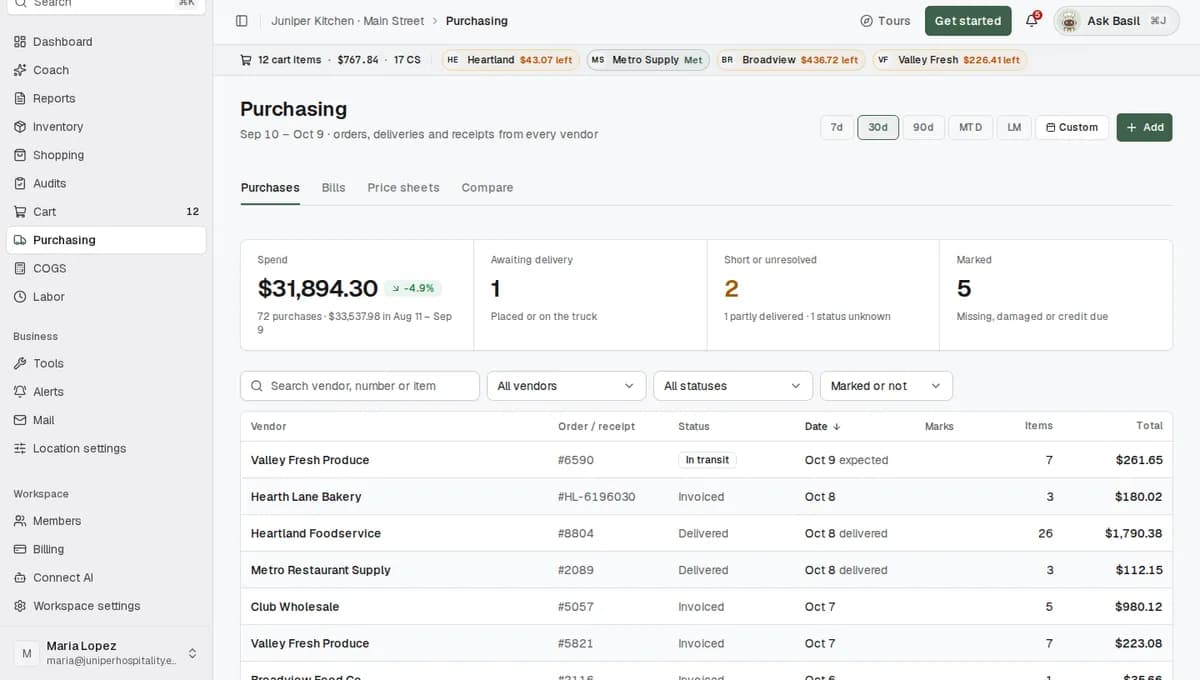
In the sidebar, click Purchasing. The page opens on the Purchases tab. Under the title you'll see the date range and "orders, deliveries and receipts from every vendor."
The page has four tabs:
- Purchases: orders and their receipts from your food and supplies vendors.
- Bills: utility, rent, repair and equipment bills.
- Price sheets: price lists your vendors send you, read line by line.
- Compare: two periods of purchases side by side.
Step 2: Pick the dates
At the top right, pick a range: 7d, 30d, 90d, MTD, LM or Custom. MTD means month to date, from the 1st until today. LM means last month. The page starts on 30d, and dates follow your location's time zone.
The range applies to the Purchases and Bills tabs.
Step 3: Use the four tiles
The tiles at the top describe everything in the range. Three of them also filter the list.
- Spend: what you were billed in the range, and how much that changed from the period before. Click it to sort the list by total, biggest first.
- Awaiting delivery: orders that are placed or on the truck. Click it to show only those.
- Short or unresolved: purchases where something came short, the status is unknown or the order failed. The number turns amber when it's above zero. Click it to show only those.
- Marked: purchases someone has marked, for example damaged or missing. Click it to show only those.
Click a tile again to clear its filter.
Step 4: Find a purchase
Use the row of filters above the list:
- The search box, Search vendor, number or item. It also searches the lines inside every receipt, so typing "cilantro" finds every purchase that had cilantro on it.
- Vendor (starts on All vendors). Each vendor shows what you spent with them.
- Status (starts on All statuses).
- Marks (starts on Marked or not). Pick Any mark or one mark, like Damaged.
The list has these columns: Vendor, Order / receipt (the order or invoice number), Status, Date, Marks, Items (how many lines) and Total. The date is the latest thing that happened, such as the day it was delivered or the day it's expected. A credit shows a negative total.
A status in plain text, like Delivered or Invoiced, means the purchase is done. A coloured label means it is still on its way or needs a look, like Placed, In transit, Partly delivered or Unknown. To learn what each one means, see Track an order from placed to delivered.
You can show 25, 50 or 100 rows per page and hide columns you don't use. Your browser remembers which columns you hid. On a phone, each purchase shows as a card.
Step 5: Open a purchase
Click any row. The purchase opens with the vendor name and its status at the top. Use the arrows at the top to move to the previous or next purchase in the list.
A strip of four numbers sits under the title:
- Total: the receipt total, for example "Receipt #10442, Oct 7". If the invoice hasn't arrived, it says "From the order; no receipt yet".
- Lines: how many lines are on the receipt. "All stock items" means every line is a product. Fees, tax and deposits count as other lines.
- Short or substituted: what didn't arrive as ordered, priced at what you paid, for example "1 short, about $47.00 at the price paid". When everything came, it says "Everything ordered arrived".
- Price up vs last delivery: the biggest price rise since your last delivery, for example "Most: Roma tomatoes +12.5%".
When another of your vendors had a line for less, a savings line appears above the receipt lines.
Step 6: Read the lines
Each line on the receipt is a row. The columns that matter most:
- Received: how much arrived. A short shows in red, so "3 of 5 CS" means you ordered 5 cases and 3 came. If the vendor swapped an item, you'll see "Substituted" and "Sent instead:" with the item they sent.
- Price each and vs last: the price you paid and how it changed since you last got the same pack.
- Check: a badge appears only when a line needs a look, for example "Quantity looks off: 2 packs for $65.98?" or "No price on this line".
- Cheaper at: your other vendors that had the same item for less. These rows are tinted green.
- Marks: notes your team adds, like Damaged or Wrong item. Click the + on a line to add one. See Mark items damaged, short or wrong.
Click a line to see every past delivery of that item.
You don't have to type in shorts. RestaurantMate reads them from the vendor's own numbers on the invoice, ordered against shipped.
Step 7: Check the receipt's math
Under the lines, RestaurantMate adds up the receipt and compares it with what the vendor billed. When it matches, you'll see a line like "18 priced lines add up to the receipt total."
When it doesn't, the sentence turns amber and gives the numbers, for example: "The lines come to $1,204.10; the vendor billed $1,214.10, $10.00 more." The Items, Tax, Fees, Discount and Total figures sit under it, so you can see where the gap is before you call your rep.
Step 8: See the original invoice
The small buttons at the top right of the purchase show their names when you hover over them. Click Open the original receipt to open the PDF or photo the vendor sent.
To check the lines against the paper, open the receipt itself: in the side panel on the right, under Receipt, open it. Then turn on Show the original beside the lines. The original sits next to the lines RestaurantMate read, and you can search it.
Step 9: Download a receipt or a whole purchase
Click Download at the top of the purchase. You can download the receipt as PDF, CSV, JSON or Markdown, or download the whole purchase.
- PDF is a printable copy.
- CSV opens in Excel or Google Sheets.
- JSON is for other software.
- Markdown is plain text you can paste anywhere.
Marks your team added come along in the download, for example "Damaged ×2" with its note.
Step 10: Find your bills
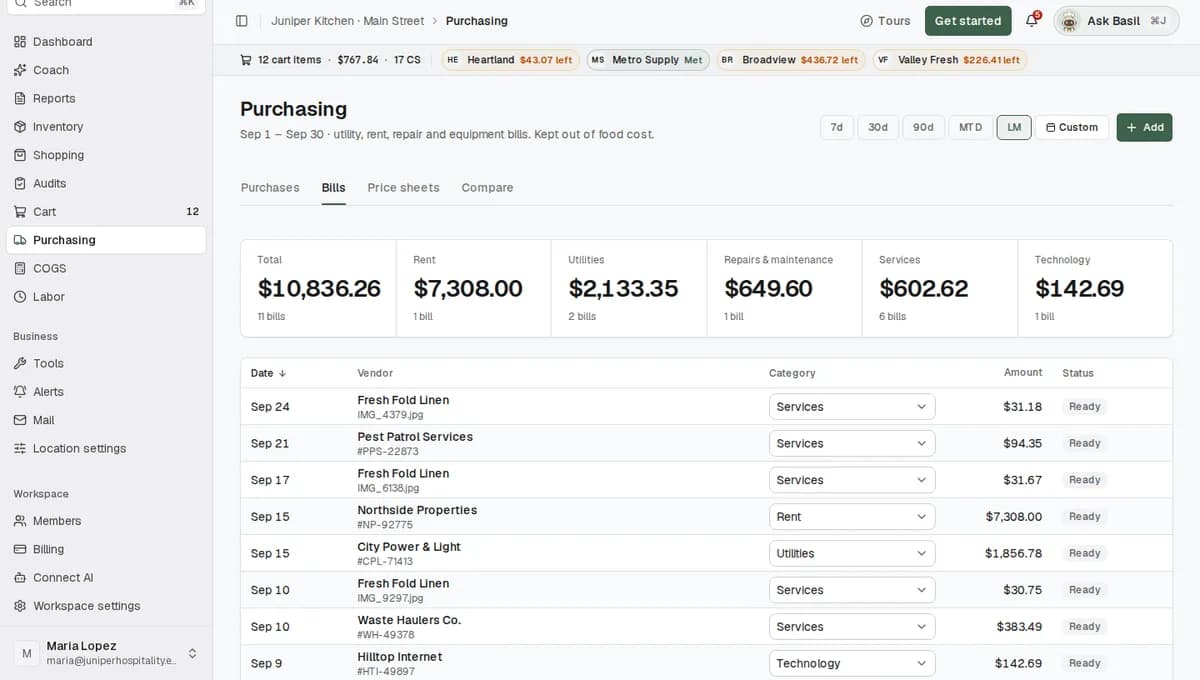
Click the Bills tab. Under the title it says "utility, rent, repair and equipment bills. Kept out of food cost."
- The first tile, Total, shows what your bills came to in the range and how many there were. The next tiles show your biggest categories, like Rent or Utilities.
- The table lists Date, Vendor, Category, Amount and Status. Click the bill number (or file name) under a vendor's name to open the file.
- To change a bill's category, pick a new one in the Category column. The category is the only thing you can change on this tab.
- Status reads Processing while we read the bill, Ready when it's done, or Couldn't read.
Bills never count toward food cost, prices or orders. To add bills and set up vendors like your landlord or power company, see Add bills and keep them out of food cost.
Step 11: Price sheets and Compare
Price sheets lists the price lists your vendors send you by email or that you upload. Each sheet is read line by line. The Matched to items column, for example "182 of 240", shows how many lines are linked to items on your lists.
Compare puts two periods side by side. It starts on last month against the month before. It covers delivered purchases, net of credits, which means credits are taken off. You can see spend by vendor and by item, and whether it moved because you bought more or because prices changed.
What happens next
When a new document arrives, RestaurantMate does the following:
- It stores the file privately. RestaurantMate reads the vendor, number, date and totals. It also reads every line: name, pack, how much was ordered and shipped, unit price and line total, plus tax, fees and credits.
- It matches each line to one of your items. The prices you paid then feed your price history, your food cost and the suggestions on your Coach page.
- It attaches the receipt to its order when the order or invoice number matches. If there is no order, the receipt becomes a purchase of its own.
- It updates the status. If everything arrived, the purchase becomes Invoiced. If something came short, it becomes Partly delivered.
- A document with a negative total is filed as a credit, whatever the vendor called it. A bill is filed under Bills.
If some lines can't be matched, the receipt shows Needs review with "Some lines could not be matched automatically."
Tips
- Check Awaiting delivery and Short or unresolved when deliveries come in to see what is still coming and what came short.
- To see what you paid for one item over time, search for it, open a purchase and click the line.
- For a vendor without a website, like a farmer who writes receipts by hand, take a photo and upload it with Add. Handwritten slips are read too. See Upload a stack of receipts, invoices or bills at once.
- Want a "Credit due" mark? It isn't in the default list, but you can add it in Location settings > Tags. That needs Full access to Location settings.
- If your role includes the in-app agent, Ask about this at the top of a purchase lets you ask questions about it in plain words.
Troubleshooting
The list says "No purchases in this window." Pick a wider range, like 90d. Vendor website invoices come in once a day, so today's delivery may not show until later today or tomorrow. If a vendor never shows up, check that it's connected. See Connect a vendor that has a website.
A vendor emailed an invoice, but it isn't here. Check three things. The sender's address must be listed for that vendor in Mail > Auto-import senders. The invoice must be a PDF attachment; photos and spreadsheets in emails are skipped, so upload those with Add. Gmail and Outlook are checked every one to two hours. See Set up your RestaurantMate inbox or connect Gmail or Outlook.
A receipt says "Needs review". Some of its lines couldn't be matched to your items. You can't fix those lines from the Purchasing page today. Tell the RestaurantMate team which receipt it is.
The Add button is greyed out. You have view-only access to Purchasing. Hover over the button to see what's missing, then ask an owner for Edit access.
The status says Invoiced, but the vendor's website still says Confirmed. The invoice shows the order was delivered, so it wins. The Status section in the side panel tells you both, for example: The vendor reported "Confirmed"; the receipt shows it was invoiced.
The lines don't add up to the invoice total. Read the amber sentence under the lines. Compare Items, Tax, Fees and Discount with the paper copy (turn on Show the original beside the lines). Then call the vendor about the difference. To keep track of it, mark the purchase, for example Disputed.
A bill says "Couldn't read". Hover over the status to see why. Then upload a clearer copy, such as the PDF or a flat, well-lit photo.
A paper receipt is missing. Paper only reaches RestaurantMate when someone uploads it. Use Add with a PDF or a photo (JPG, PNG, WebP or HEIC), up to 20 MB each and 20 files at a time.
Common questions
Do I have to upload invoices myself? Only paper ones. For vendors with a website, we pull invoices once a day with your login. Vendors that email invoices can send them to your RestaurantMate inbox, or you can connect Gmail or Outlook. For paper and handwritten slips, a phone photo uploaded with Add works.
How far back will I see my invoices? When you connect a vendor's website, we pull about the last six months (180 days) of invoices. For Gmail or Outlook, the Scan button next to a sender in Mail looks back up to a year, up to 25 emails per sender.
Are rent and utility bills counted in my food cost? No. Bills sit on the Bills tab and are left out of food cost, prices and orders. Bills aren't in the weekly report or on the dashboard yet. There are no due-date reminders, and RestaurantMate doesn't track whether a bill is paid.
If I mark an item damaged, does RestaurantMate ask the vendor for a credit? No. A mark is a record for you, your manager and your bookkeeper: who marked it, when, how many and why. Nothing is sent to the vendor. Use the Marked tile or the Marks filter to see what's still open.
Can my bookkeeper use this page? Yes. The built-in Bookkeeper role sees Dashboard, Reports, Purchasing, COGS and Labor. It can also upload documents and add marks. For someone who should only look, use the View only role.