
Add a vendor you don't log in to online, so their invoices and prices still reach RestaurantMate.
Some vendors email you a PDF invoice after each delivery. Others take your order by phone, and the driver hands you a paper slip. RestaurantMate can read both. Emailed invoices come in through your RestaurantMate inbox or your own Gmail or Outlook. Paper receipts come in as photos from your phone. Either way, every line is read and the prices sit next to your other vendors' prices.
The examples use the demo restaurant Juniper Kitchen · Main Street. Its bread comes from Hearth Lane Bakery, which emails an invoice from its rep, Simone Archer.
Before you start
Who can do this. Owners can do every step. So can people with the built-in Admin or Location manager role, because those roles can edit Mail. Uploading receipts needs Edit on Purchasing. If a button is greyed out, hover over it to see what's missing, then ask your owner. See Give each person only the pages they need.
What you need:
- The vendor's name as it's printed on their invoices.
- The email address their invoices come from. Open an old invoice email and copy the sender's address. For Hearth Lane Bakery it's
simone@hearthlane.example. - For paper vendors, a few of their receipts and your phone.
A few words you'll see:
- Rep: your contact at the vendor, such as a sales rep or their billing office. In RestaurantMate a rep is a name and email address tied to one vendor.
- Sender: an email address RestaurantMate watches for you. Only emails from senders you add are imported.
- RestaurantMate inbox: an email address for your location ending in
@mail.rmate.ai. Screens in the app shorten it to "RMate inbox". - Custom vendor: a vendor you add by name. RestaurantMate doesn't sign in anywhere for it. You send in its paperwork instead.
- Price sheet: the price list a vendor sends out.
If your location is still being set up
If every page sends you to the Welcome to RestaurantMate screen, your location isn't live yet. Add the vendor there and our team sets it up with you.
- On the Vendors card, click Add vendor, type the Name and click Add vendor.
- Under How do you order? pick Email ("Invoices arrive by email.") and list the addresses in Invoice emails, one per line. For vendors you call, visit or who hand you a paper slip, pick Other ("Phone, walk-in, paper.").
- Add the Rep name and Rep phone if you have them. In Notes, say how you order and how the invoice reaches you. For example: "Call Simone before 2 pm. The invoice comes by email the next morning."
- On the Email card, connect Gmail or Outlook now, or click Not now. You can create a RestaurantMate inbox once the location is live.
- Finish the other cards, tick the box and click Send.
You can still add vendors after you send. The screen tells you when we're done. Setup usually takes a few days. After that, use the steps below to add more vendors yourself.
Part 1: A vendor that emails invoices
Step 1. Give the location an inbox
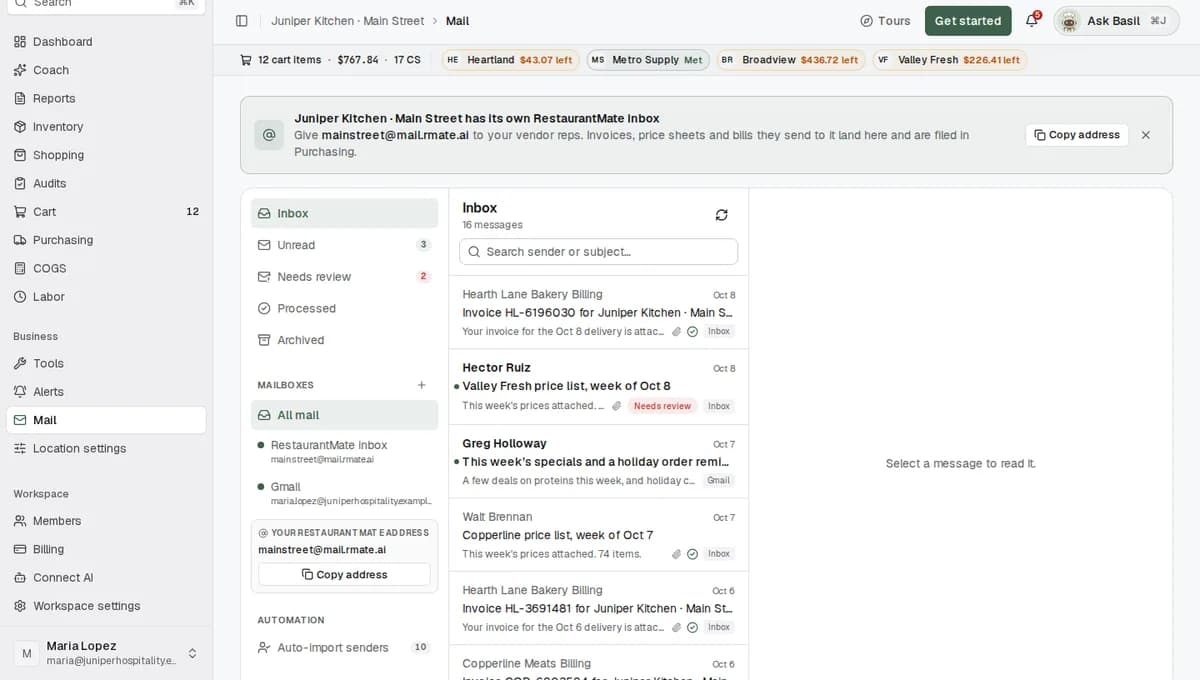
Open Mail in the sidebar, under Business. The first time, you'll see two choices. You can use one or both.
Create an RMate inbox. RestaurantMate fills in an address from your location's name, such as mainstreet@mail.rmate.ai. Change the part before the @ if you like, then click Create inbox. A message confirms "Inbox created: mainstreet@mail.rmate.ai". Click Copy address to copy it.
Connect an existing mailbox. Click Connect Gmail or Connect Outlook and sign in to Google or Microsoft. Pick this if vendors already send invoices to an address you use. RestaurantMate gets read-only access. It can't send, delete or move your mail.
Step 2. Add the vendor's rep as a sender
- In the left column of Mail, click Auto-import senders, then Add sender.
- Mailbox: pick the inbox where this vendor's emails will arrive.
- Documents: leave it on All to import invoices and price sheets. Pick Invoices or Prices to import only one kind.
- Rep: pick the vendor's rep. If they aren't in the list, click Add rep and fill in the Add vendor rep form:
- Vendor: pick the vendor. If it's new, type its name and choose Add custom vendor. Enter the Vendor name, set What do you buy from them? to Food & supplies, and click Add vendor.
- Name and Email. Use the address the invoices come from.
- Phone (optional) and Role. Pick AR / billing for a billing office (AR is short for accounts receivable, the team that sends invoices).
- Click Add rep.
- Vendor and Sender email fill in from the rep. Check them and click Add sender. You'll see "Email sender added."
You can also add reps first in Location settings, on the Reps tab, with Add rep. They then show up in the Rep list here.
Step 3. Tell the vendor where to send invoices
If you made a RestaurantMate inbox, send the address to your rep and ask them to email invoices there. The address card in Mail's left column has a Copy address button. RestaurantMate doesn't contact your reps, so this message comes from you.
If you connected Gmail or Outlook, the vendor doesn't need to change anything.
Part 2: A vendor you call, visit or who hands you paper
Step 1. Upload their receipts
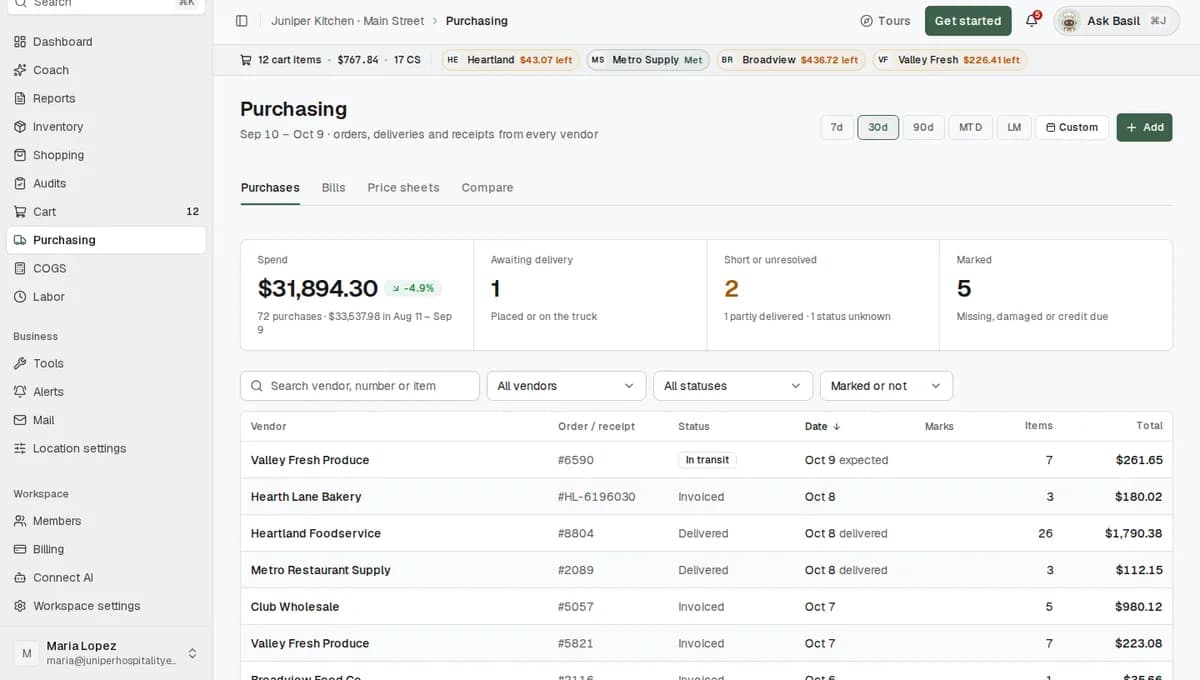
- Open Purchasing and click Add at the top right.
- In Add documents, drop up to 20 photos or PDFs, or click to choose them. On a phone, this opens your photos. Handwritten slips work.
- RestaurantMate reads each file and fills in the type, vendor, date, number and total. A vendor it hasn't seen before shows as New: followed by the name printed on the receipt. Check the name and set What do you buy from them?. The vendor is created when you submit.
- If a stack of slips reads as several spellings of one vendor, a banner asks if you want to use one vendor for all of them. Pick the vendor and click Apply.
- Click Submit. The button shows how many files are ready, such as Submit 3.
Want to add the vendor before you have a receipt? Go to Location settings, open the Reps tab and click Add rep. In Vendor, type the name and choose Add custom vendor.
Step 2. Record a phone order (optional)
Recording an order lets your team see it in Purchasing before the receipt comes in.
- In Purchasing, click Add, then Or record an order by hand.
- Pick the Vendor, the Placed on date and the Expected delivery date if you know it.
- Add each item with its Qty and Unit. Add the Unit price if you know it.
- If the vendor gave you an order number, enter it in Order number. When an invoice with the same number arrives, it joins this order.
- Click Record order.
Recording an order sends nothing to the vendor. It's a note for your team.
Bills that aren't food
Some vendors send bills for things like electricity, rent or repairs. Set What do you buy from them? to Bills & services and pick a Category for their bills. Their invoices then go to the Bills tab in Purchasing and stay out of your food cost. This works for emailed bills too.
To change a vendor later, open Location settings, go to the Reps tab and find the vendor in the Vendors list. New uploads follow the new setting.
What happens next
- Email sent to your RestaurantMate inbox shows up within about a minute. Gmail and Outlook are checked every one to two hours.
- RestaurantMate reads each PDF attachment, works out what kind of document it is, such as an invoice or a price sheet, and reads every line. Each line is matched to your items.
- Invoices show up in Purchasing on the Purchases tab. Price sheets go to the Price sheets tab and bills go to Bills. In Mail, the email is marked Processed.
- The same PDF file isn't imported twice.
- Prices from these invoices show next to your other vendors' prices for the same item. They carry a No vendor SKU label (a SKU is the vendor's item number). You can compare these prices, and you order the item the way you do today. Each price is as recent as the vendor's last invoice or price sheet.
- If one of their items is in your cart when you send it, that vendor's card says "This vendor has to be ordered by hand." Call, email or text your rep as usual.
- The order appears in Purchasing when its invoice or receipt arrives, or as soon as you record it by hand.
Tips
- Copy the sender from a real invoice email. Invoices often come from a billing address instead of the rep's own address. If a vendor uses both, add a rep for each address.
- Ask vendors to email the inbox directly. If you forward invoices yourself, your own address becomes the sender. One sender address can belong to only one vendor, so forwarding invoices from several vendors won't sort them correctly.
- Pull in old invoices from Gmail or Outlook. In Auto-import senders, click Scan next to a sender. It looks back up to a year, up to 25 emails from that sender.
- One address for two locations. When you set up Mail at Juniper Kitchen · Riverside, you can share the Main Street address instead of making a new one. Each location imports only from the senders added at that location, so add the vendor's sender at both.
- Take a break from a sender. Click Pause next to the sender to stop importing, and Resume to start again.
Troubleshooting
An email is in Needs review with "Waiting for a vendor sender rule." The address it came from isn't one of your senders. Add a sender for that exact address (Part 1, Step 2). New emails from it will import. For the one that's waiting, ask the rep to send it again, or upload the PDF with Add in Purchasing.
An email is in Needs review with "Sender authentication did not pass; review is required." Email systems check that a message really comes from the company it claims to be from. This one didn't pass the check, so RestaurantMate held it and didn't import the attachment. This protects you from fake invoices. Ask the rep to send it straight to your inbox address. If it keeps happening, contact us.
An email shows No document. RestaurantMate reads only PDF attachments from email. Photos and spreadsheets attached to an email are skipped. Upload photos with Add in Purchasing instead.
Auto-import senders says "Connect a mailbox first". Create the RestaurantMate inbox or connect Gmail or Outlook first (Part 1, Step 1).
Invoices from Gmail or Outlook haven't shown up. Wait up to two hours. Each check looks at the last 30 days, and only at emails with attachments from your senders. For older invoices, use Scan. If the mailbox shows Not connected in Mail's left column, connect it again with the same email address and allow RestaurantMate to read your mail.
An upload says "This vendor is set up for food and supplies." You uploaded a bill for a food vendor. Change the row's Type to Receipt, or change the vendor to Bills & services on the Reps tab in Location settings.
The Add button in Purchasing is greyed out. Your role doesn't have Edit on Purchasing. Hover over the button to see why, then ask your owner.
Common questions
Do I need to give you a password for these vendors? No. A login is only needed for vendors you order from on a website. See Connect a vendor that has a website.
Will RestaurantMate read all my email? No. Gmail and Outlook access is read-only, and RestaurantMate imports only emails from the senders you add. Everything else is ignored.
Should I use the RestaurantMate inbox or connect Gmail? Either works. Connect Gmail or Outlook if vendors already send invoices there. Use the RestaurantMate inbox for new vendors, or to keep invoices out of your own inbox. The RestaurantMate inbox is also faster: about a minute, compared with up to two hours.
Can I compare this vendor's prices with my other vendors? Yes. Every invoice line becomes a delivered price, which is what you actually paid. It shows next to your other vendors' prices for the same item. Price sheets they email add prices too.
Can RestaurantMate order from this vendor for me? No. Without a website there's no online cart to fill, so you keep ordering by phone, email or in person. If the vendor does have a website you order on, connect it with your login instead. See Connect a vendor that has a website.